Synopsis #
This chapter describes preparing installation media, selecting a disk layout, installing file sets, and completing initial system setup.
Obtaining Installation Media #
Official OpenBSD installation images are distributed via the OpenBSD mirror network. The master list of mirrors is maintained at:
Choose a mirror close to your geographic location for best performance. The installation sets for the current release are found under:
/pub/OpenBSD/7.9/ARCH/
Replace ARCH with your hardware architecture (e.g., amd64, arm64, i386).
For example, the amd64 directory for OpenBSD 7.9 is:
https://cdn.openbsd.org/pub/OpenBSD/7.9/amd64/
Installation Images #
Common installation images include:
install79.img- USB install image (recommended for most users).install79.iso- ISO image for CD/DVD media.miniroot79.img- small USB/PXE image for custom or network setups.
Downloading via Command Line #
On an OpenBSD system, use ftp(1) :
$ ftp https://cdn.openbsd.org/pub/OpenBSD/7.9/amd64/install79.img
$ ftp https://cdn.openbsd.org/pub/OpenBSD/7.9/amd64/SHA256.sig
On Linux or macOS, alternatives include curl(1) or wget(1):
$ curl -O https://cdn.openbsd.org/pub/OpenBSD/7.9/amd64/install79.img
$ wget https://cdn.openbsd.org/pub/OpenBSD/7.9/amd64/SHA256.sig
Always fetch the corresponding SHA256.sig file, which contains signatures for all release files.
Verifying Signatures #
Verification ensures the image has not been tampered with. Use signify(1)
with the release public key (already installed on OpenBSD systems in /etc/signify/):
$ signify -C -p /etc/signify/openbsd-79-base.pub -x SHA256.sig install79.img
On non-OpenBSD systems, download the correct public key from https://ftp.openbsd.org/pub/OpenBSD/
under the release directory (e.g., openbsd-79-base.pub) and verify against it.
A successful verification prints OK. If it fails, do not use the image.
Writing the Installation Image to USB #
The downloaded .img file must be written raw to a USB stick. Writing to the wrong disk will destroy existing data, so carefully identify the correct device before proceeding.
Identifying the Target Disk #
On OpenBSD, use dmesg(8) immediately after inserting the USB stick:
$ dmesg | tail
sd6 at scsibus3 targ 1 lun 0: <Generic, Flash Disk, 8.07> removable
sd6: 30528MB, 512 bytes/sector, 62537728 sectors
This shows the device is sd6. Always use the raw device (rsd6c) when writing with dd(1)
.
On Linux, check with lsblk(8):
$ lsblk
NAME   MAJ:MIN RM  SIZE RO TYPE MOUNTPOINT
sda      8:0    0 477G  0 disk
├─sda1   8:1    0 512M  0 part /boot
├─sda2   8:2    0 476G  0 part /
sdb      8:16   1 29.3G  0 disk
└─sdb1   8:17   1 29.3G  0 part /media/usb
Here the USB stick is /dev/sdb. Unmount any partitions before writing.
On macOS, use diskutil(8):
$ diskutil list
/dev/disk2 (external, physical):
   #:                       TYPE NAME           SIZE       IDENTIFIER
   0:     FDisk_partition_scheme             *31.9 GB    disk2
   1:                 DOS_FAT_32 UNTITLED     31.9 GB    disk2s1
The correct device is /dev/disk2. For raw writes, use /dev/rdisk2.
Writing on OpenBSD #
# dd if=install79.img of=/dev/rsd6c bs=1m
Writing on Linux #
$ sudo dd if=install79.img of=/dev/sdX bs=1M status=progress conv=fsync
Replace /dev/sdX with the target USB disk (e.g., /dev/sdb).
Writing on macOS #
$ diskutil unmountDisk /dev/disk2
$ sudo dd if=install79.img of=/dev/rdisk2 bs=1m
$ sync
Graphical Options #
If a graphical tool is preferred, the following applications can directly write .img files:
- balenaEtcher
- Fedora Media Writer
- Rufus (Windows only)
Pre-Installation Tasks #
Minimum Requirements #
Choose memory and disk space for the intended workload. The walkthrough uses 2 GiB of RAM and a 32 GiB disk. Review the filesystem sizes proposed by the installer; free space assigned to one filesystem cannot be used by another.
Backup and Preparation #
Make full backups if the target system contains valuable data or if it will be used in a multiboot configuration. Backups should be stored externally.
Information to Gather #
- Hostname
- Time zone
- Root password
- User account details
- Static IP configuration (if not using DHCP)
- Disk layout and encryption choices
Firmware Setup #
- Disable Secure Boot in UEFI
- Enable UEFI or BIOS boot depending on your hardware
- Set USB or CD/DVD drive as the first boot device
Running the Installation #
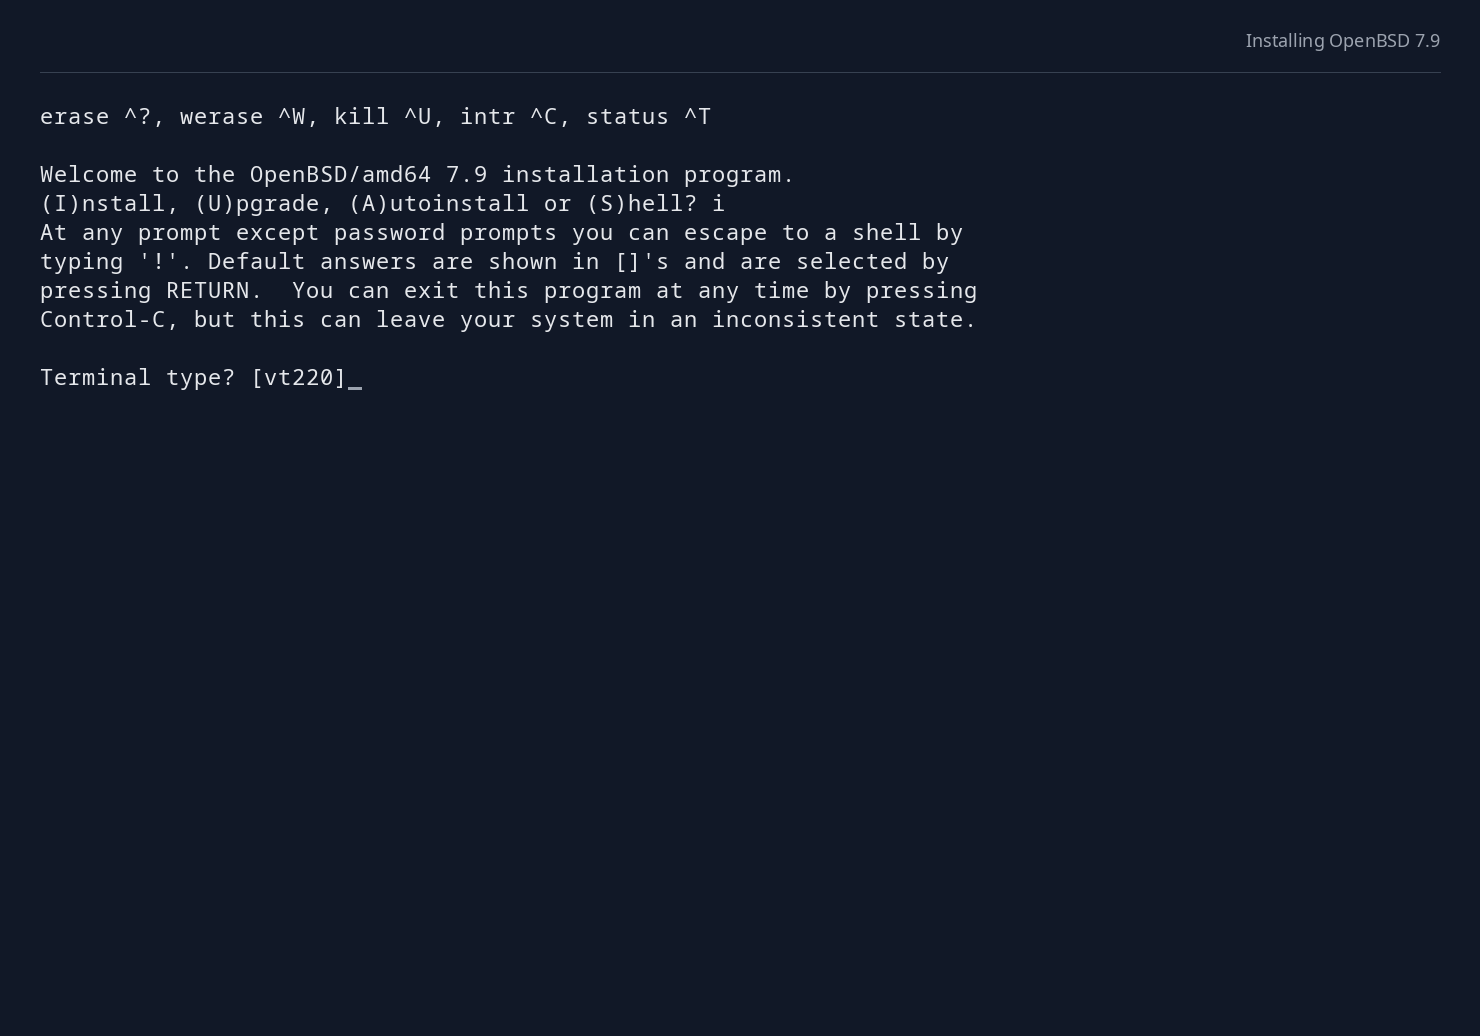
Boot the system from the prepared USB stick. At the installer prompt:
(I)nstall, (U)pgrade, (A)utoinstall or (S)hell?
Choose I to begin a fresh installation.
Installer Prompts (Annotated) #
Terminal and System Setup #
- Terminal type?
Default
vt220works for most systems.
Networking #
System hostname? Example:
myrouterWhich network interface to configure? Select interface or type
done.IPv4 address?
autoconf,none, or a static address. Theautoconfchoice obtains IPv4 configuration through DHCP.IPv6 address?
autoconf,none, or static.Default IPv4 route? Only if static IP. Example:
192.168.1.1.DNS domain name? / DNS nameservers? Usually provided via DHCP.
Users and Access #
Password for root? Input is hidden.
Start sshd(8) ? Choose
yesif remote login is needed.Setup a user? Recommended. Enter lowercase username.
Allow root ssh login? Choose
noorprohibit-passwordfor security.
Timezone #
- What timezone are you in?
Use
?to list options.
Disk Setup #
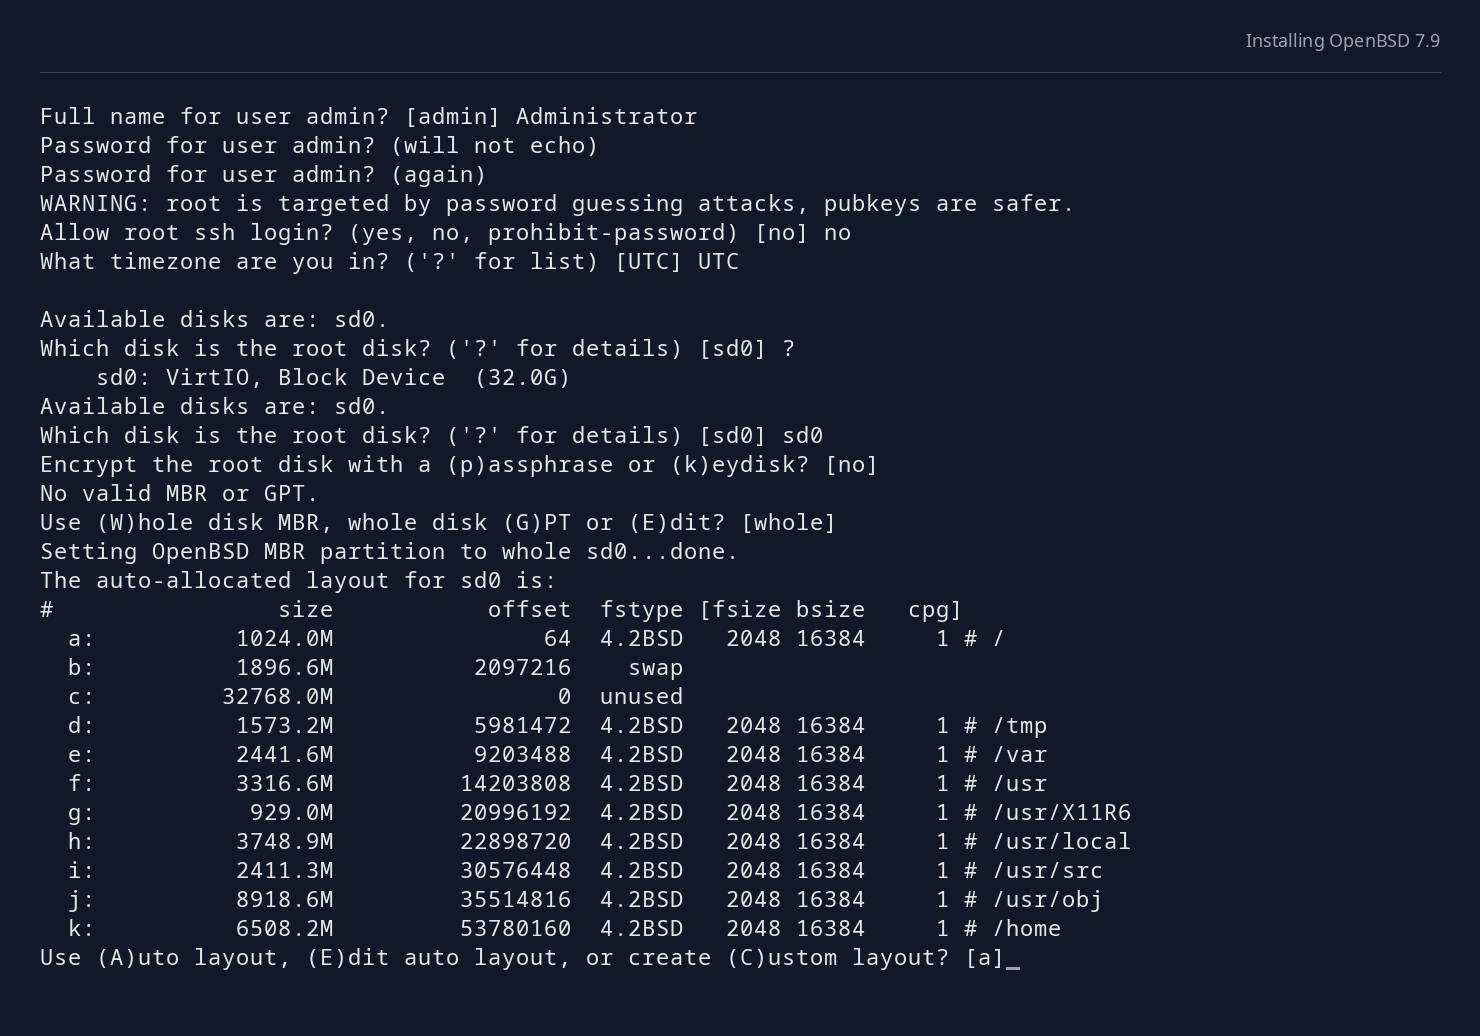
Which disk is the root disk? Example:
sd0.Partitioning scheme? GPT is preferred on UEFI systems.
Use (A)uto layout, (E)dit auto layout, or create (C)ustom layout? Review the displayed sizes and mount points before accepting the automatic layout. It separates filesystems such as
/,/var,/tmp,/usr, and/home. Adjust the layout when the intended workload requires different allocations. Leave free space in/usrfor updates and kernel relinking. On small disks, edit the automatic layout if/usrhas too little space. Check the final installer output for errors even if it displays a completion message.
Encryption #
On supported installation paths, the installer offers root-disk encryption before partition layout, using a passphrase or key disk. The basic walkthrough below accepts the unencrypted default. See Full-Disk Encryption for an encrypted installation.
File Sets #
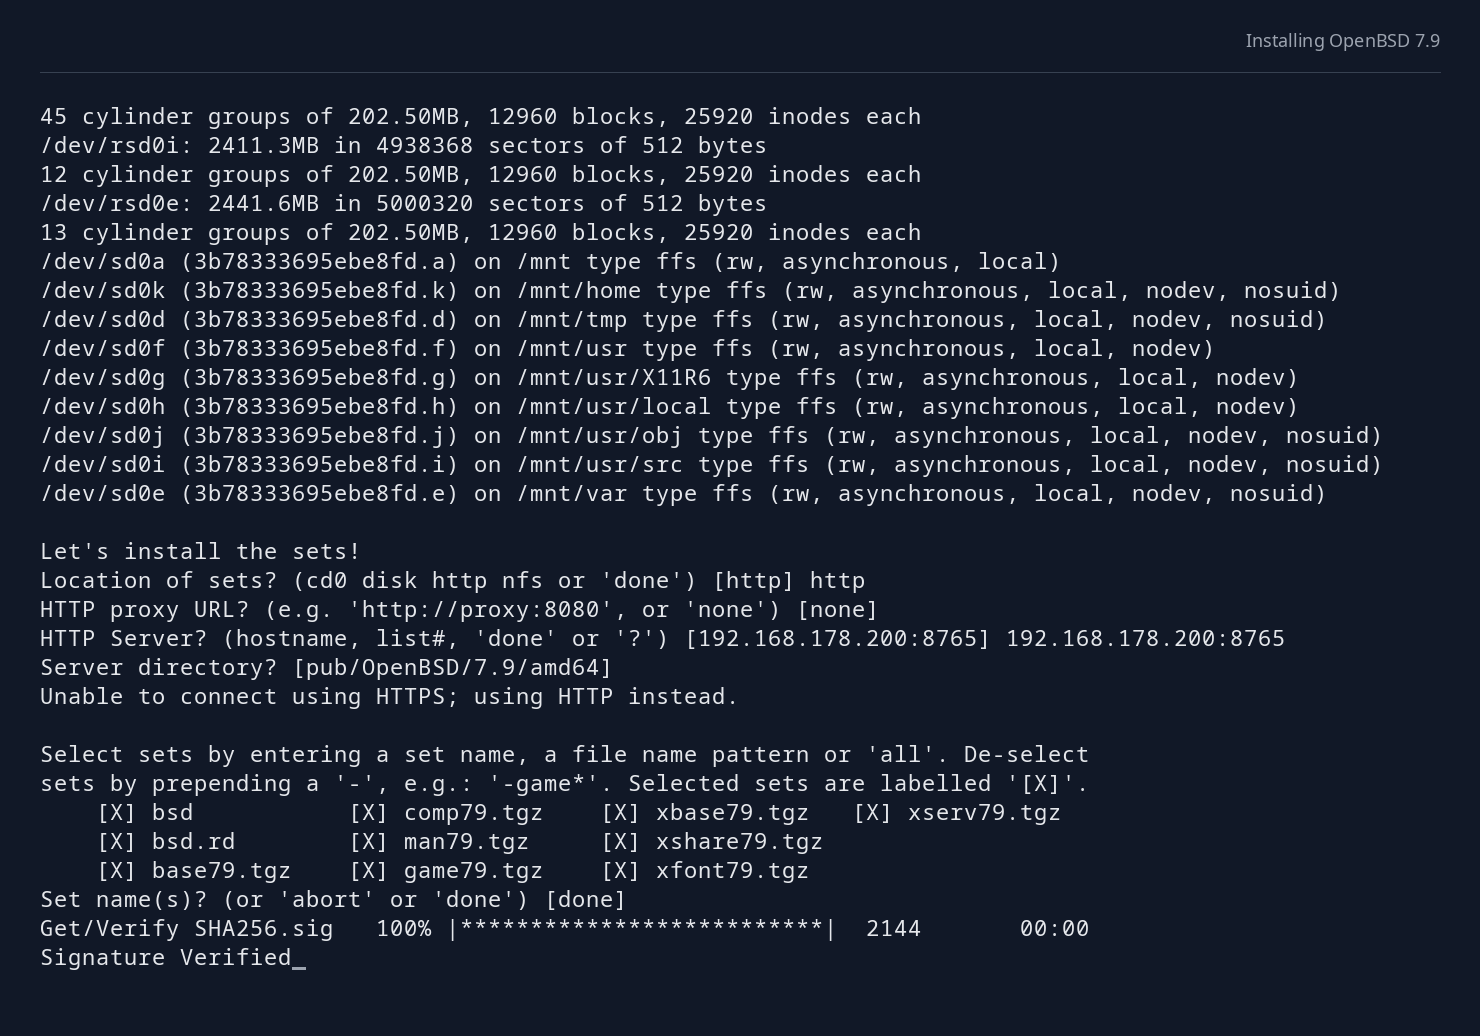
Location of sets? Usually
http.Mirror and path? Example:
cdn.openbsd.org
pub/OpenBSD/7.9/amd64/
Select/deselect sets Default is fine. Use
-game*to skip games.
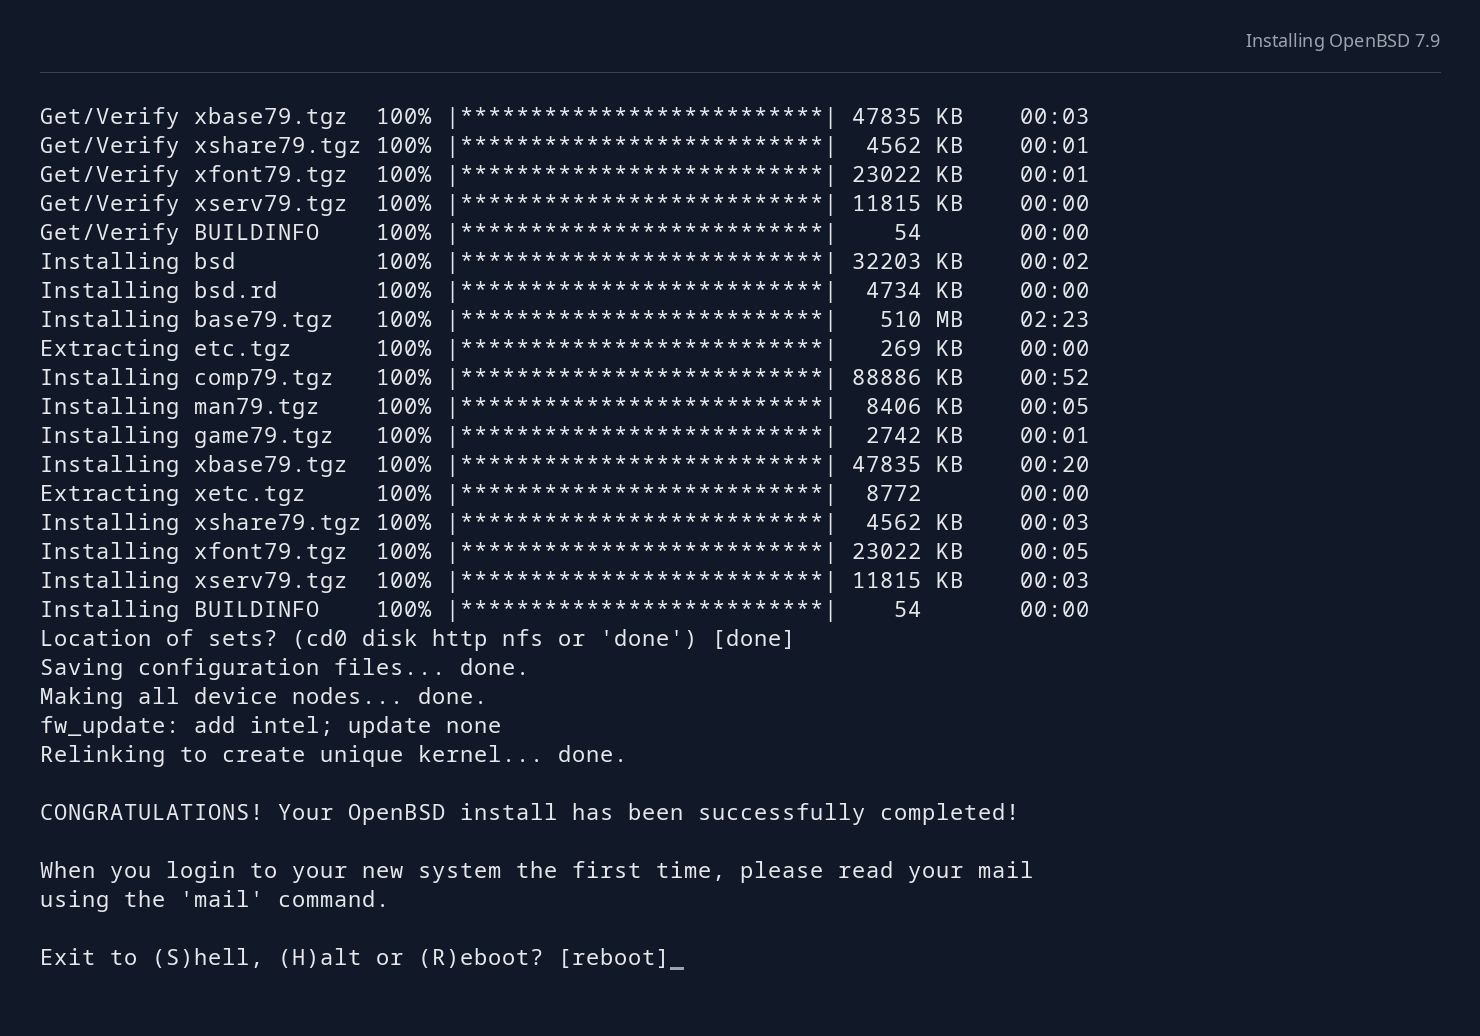
At the end:
CONGRATULATIONS! Your OpenBSD install has been successfully completed!
Exit to (S)hell, (H)alt or (R)eboot? [reboot]
Installation Walkthrough #
Screenshots
Post-Installation Configuration #
Once the system reboots, perform these steps:
Logging In and Configuring doas #
Log in on the console as root for initial administration. A regular account created by the installer belongs to the wheel group, but doas(1)
requires a policy in /etc/doas.conf before it can grant access.
As root, create /etc/doas.conf with the following policy when members of wheel should administer the system:
permit persist :wheel
Protect and validate the file:
# chmod 600 /etc/doas.conf
  # Restrict access to the policy file
# doas -C /etc/doas.conf
  # Check policy syntax
Then log in as the regular user and verify access:
$ doas id
The command prompts for that user’s password and should report uid=0(root). Use the regular account for routine work.
Confirm the Update Mirror #
Check installurl(5) before fetching patches or packages:
# cat /etc/installurl
A local server used only for installation sets may not provide patches or packages. If necessary, select a complete mirror:
# echo "https://cdn.openbsd.org/pub/OpenBSD" > /etc/installurl
Apply Binary Patches #
Run syspatch(8) :
# syspatch
Reboot when requested to load a patched kernel.
Package Updates #
Update installed packages with pkg_add(1) :
# pkg_add -u
A fresh installation may have no third-party packages to update. Configuration merging with sysmerge is part of a release upgrade
, rather than a required step after every binary patch.
Configure Timezone #
The installer selects the timezone. To change it later, update the /etc/localtime symbolic link to a file under /usr/share/zoneinfo, as described in afterboot(8)
:
# ln -fs /usr/share/zoneinfo/Europe/Amsterdam /etc/localtime
  # Select the timezone
# date
  # Check the displayed local time
Enable Services #
Use rcctl(8) :
# rcctl enable ntpd
# rcctl start ntpd
# rcctl ls on
Review System Logs #
# tail -n 60 /var/log/messages
# sysctl hw.sensors
# ifconfig -A
Configure Remote Access #
Ensure sshd(8) is enabled and copy keys:
$ mkdir -m 700 ~/.ssh
$ chmod 600 ~/.ssh/authorized_keys
Verify Disk Encryption #
If enabled, system prompts for a passphrase at boot. Swap encryption is automatic.
# bioctl softraid0
UEFI Boot Notes #
OpenBSD installs its bootloader at:
/EFI/BOOT/BOOTX64.EFI
Most firmware detects it automatically. Secure Boot must be disabled.
Custom Installation with siteXX.tgz
#
OpenBSD supports an additional file set named site79.tgz which is extracted after all base system sets. It allows administrators to inject custom configuration, scripts, and files into new installations in a clean and supported manner.
When It Is Applied #
- During interactive installation: automatically, after sets are installed.
- During unattended installation: always, without prompting.
- During stateless boot: if present, extracted into RAM.
The installer automatically looks for both a generic archive:
site79.tgz
and a host-specific variant:
site79-HOSTNAME.tgz
Typical Contents #
Examples:
etc/rc.conf.local
etc/pf.conf
etc/hostname.em0
root/.ssh/authorized_keys
install.site
usr/local/bin/custom-script
Example Creation #
# tar -C /path/to/custom/root -czphf site79.tgz .
Ensure file modes and ownership are preserved. The included install.site script (if present) will be executed at the end of installation.
Example install.site
#
#!/bin/sh
echo "Provisioning $(hostname)" >> /var/log/install.log
pkg_add rsync htop
rcctl enable sshd
This enables post-install automation.
Example Use Cases #
Network Configuration #
etc/hostname.em0
inet 192.168.1.10 255.255.255.0
up
Firewall Rules #
etc/pf.conf
set block-policy drop
block all
pass in on egress proto tcp to port ssh
Enable Services #
etc/rc.conf.local
sshd_flags=
ntpd_flags=
smtpq=YES
Add User SSH Keys #
root/.ssh/authorized_keys
ssh-ed25519 AAAA... root@admin
Pre-Configure Package Mirror #
etc/installurl
https://cdn.openbsd.org/pub/OpenBSD
Unattended Installation #
OpenBSD can install itself automatically using a configuration file and optional custom file sets.
How It Works #
- Boot the installer with
auto_install(pressaat the boot prompt). - The installer fetches a configuration file named
install.conf.- From a USB stick (FAT32).
- From an HTTP server specified by DHCP options.
- Optionally apply
siteXX.tgzarchives and runinstall.site.
Example install.conf
#
System hostname = server1
Password for root = *************
Setup a user = alice
Public ssh key for user = ssh-ed25519 AAAA... alice@laptop
Location of sets = http
HTTP Server = cdn.openbsd.org
Set name(s) = -game* +xbase +xshare
Deployment Options #
- PXE boot + DHCP: serve
bsd.rdandinstall.confautomatically. - USB stick: include
install.confandsiteXX.tgzon the stick root.
This allows fully automatic provisioning of many machines with identical or host-specific settings.
Stateless Setup #
In a stateless setup, OpenBSD does not install to persistent storage. Instead, it boots into RAM using bsd.rd and optional siteXX.tgz. All changes vanish at reboot unless explicitly written elsewhere.
Characteristics #
- All filesystems (
/,/var,/tmp) live in memory. - Boot from PXE, USB, or CD-ROM.
- Excellent for kiosks, appliances, ephemeral nodes.
Building a Stateless Environment #
Prepare
bsd.rdObtain from the release directory and serve via TFTP or place on USB.Create
siteXX.tgzAdd/etcconfigs, scripts, andinstall.site.Automate with
install.siteExample:#!/bin/sh echo "Stateless boot at $(date)" >> /var/log/stateless.log ftp -o /etc/runtime.conf https://config.example.org/host.conf mount_mfs -s 64m swap /var mount_mfs -s 64m swap /tmpBoot the system OpenBSD extracts
siteXX.tgzand executesinstall.site.
Considerations #
- Memory consumption increases with each writable filesystem.
- Logs and installed packages disappear unless exported.
- Data should be uploaded to remote systems at shutdown.
Troubleshooting #
- Review dmesg(8) and installer output.
- Confirm UEFI/BIOS settings.
- Always consult the
INSTALL.archfile in the release directory